
This article will help guide you through installing your GlacierGrid Monitoring system.
Before we begin installing, let's make sure you have the following items:
1. GlacierGrid Hub, 2 antennas, 1 power chord
2. GlacierGrid Sensor(s)
3. Zip ties
Next, verify that you have a dashboard login. Confirm this by logging into your GlacierGrid Dashboard or with the GlacierGrid App. If you cannot locate your dashboard invitation link, please reach out to support@glaciergrid.com and our team will resend the link to your inbox.
Once you have confirmed you have all the hardware and a dashboard login, you're ready to begin!
Hardware Installation
1. Set up your hub. First, check out our article on best practices for placing your hub to optimize your connectivity. Be sure to try and choose a location where the hub will not be disturbed or unplugged, it's visible so that individuals can identify if it's lost connectivity, not directly near any electronic equipment, and it's within close vicinity to the sensor(s).
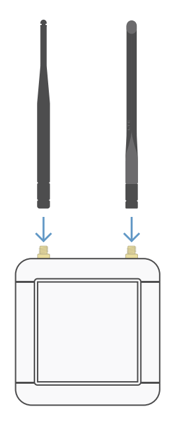
We have two versions of our hardware. Be sure the placement of your antennas matches the image showing the kind of hub that you received.
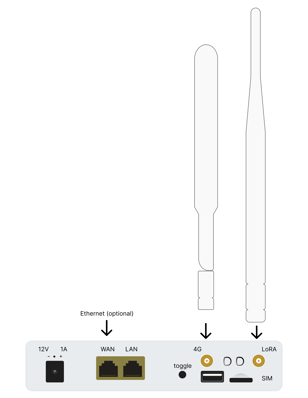
- Once a location has been determined, start attaching the antennas and the power chord. Please note: you may need to try multiple locations to find the best connectivity at your facility.
- Plug it in.
- If you have the hub shown on the left:
- Wait for 2 solid red lights. The power icon and globe icon should be solid red. Upon first setting up your hub, it may take some additional time for the hub to locate the cellular connection in your area. Leave your hub plugged in and move to the next step, even if your hub's globe light continues to flash.
- If you have the hub shown on the right:
- The lights will remain green. Flashing lights indicate that the hub is still searching for a connection. Upon first setting up your hub, it may take some additional time for the hub to locate the cellular connection in your area and the lights may continue to flash after establishing a connection. Leave your hub plugged in and move to the next step, even if your hub's globe light continues to flash.
- You may need to come back to this step to try the hub in different positions in your facility to locate the most optimal positioning for cellular connection.
Linking your sensors
The step can be completed via the desktop or the GlacierGrid app. We recommend using the app, as you can scan the QR code on the sensor (reducing the likelihood of entering an incorrect serial number).
1. Create a location.
- GlacierGrid App
- Login into your GlacierGrid App (same login as the desktop version).
- While on the sensors page of your app, locate the (+) icon on the top right-hand corner and click on "Add Location".
- Create a Location Name, ie. John Smith Middle School and input the address associated with that location.
- Click Save.
- GlacierGrid Web Dashboard
- Sign in using this link.
- Navigate to the Sensors Tab of your dashboard.
- Click on "Add Location" (pink icon on the right-hand side)
- Create a Location Name, ie. John Smith Middle School and input the address associated with that location.
- Click Save.
2. Add Sensor(s). Now that your location has been created, it's time to add your sensors. Carefully, line up your sensors (organization in this step is key). You want to make sure the sensor goes into the correct unit as it is named in the Dashboard.
- GlacierGrid App
-
-
- Click on the plus sign on the top right of your screen.
- Click on "Add equipment".
- Select the location the equipment is at.
- Locate "Sensor ID", and click Add.
- Your camera will open and prompt you to scan the QR code on the sensor. Once captured, the serial number will be automatically input into the ID field. You can also manually type in the number starting with LHT or HT65.
-
-
- GlacierGrid Web Dashboard
- Click on the "Add Sensor" icon, to the right of the location you just created.
- Enter the serial number on the sensor (this will begin with LHT followed by several numbers). Double-check that the serial number is correct! If incorrect, your sensor will not connect.
- Create a sensor name, ie. Walk-in Refrigerator #1 or Ice Cream Room
- Designate the equipment type, set point, and temperature set point. Carefully, place it back in the box it came in.
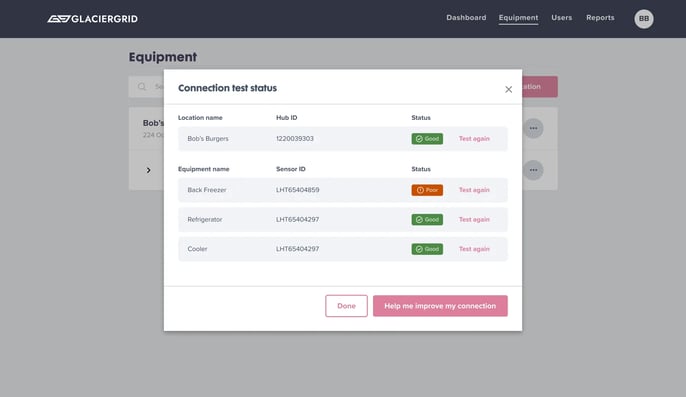
3. Activating your sensors and checking connectivity
Once you have added all of your sensors, the app will take you through connectivity testing to ensure your hardware is correctly installed.
- Take out your first sensor, press down on the ACT (blue button on the top of the sensor) for 5 seconds, until you see a red flash, then release. Repeat this step for all sensors. We want to make sure we don't mix up the sensors.
- Your screen will walk you through troubleshooting your connectivity in the event your signal is not strong.
You will want to give the sensor(s) time to acclimate to the equipment. You may find the temperature is higher when it first reports a reading.
If you are still unable to generate a temperature reading, please refer to our Troubleshooting Section or contact customer support.
4. Place your sensors in your equipment and celebrate not having to manually monitor your temperatures!
Best practices for the placement of your sensors include:
-
- Ensure your sensor is situated vertically, with the QR code facing the direction of the hub.
- Place GlacierGrid sensors in the middle of the unit, with enough space to read the temperature around them.
- Do not put sensors near doors or fans. Sudden gusts of airflow pointed at the sensor can cause inaccurate temperature data and trigger excessive alerts.
- Do not place sensors within or directly on top of food.
- Do not submerge sensors in water, above heat or fire, or in ziplock bags.
5. Now that your dashboard is set up, configure alerts to receive the notification of your choice when your equipment goes outside of your configured temperatures. To learn more about setting up alerts, click here.
6. Now it's time to Get to Know Your Dashboard! Explore the different features available to you such as adding users, creating and using teams, how to read your graph, and more!